Local Media Server part 2
Since the first post about the server, there have been several changes to the server and its environment. In the following posts, I’ll explain what those changes were.
Updates have been made on the server, can read about it in the Third post.
From CloudFlare Tunnels to a Personal DDNS provider
One of the first changes I made to the server was switching from Cloudflare Tunnels to a custom DDNS provider.
The primary reason for this change was my interest in installing Nextcloud and their documentation about the limitations when using Cloudflare Tunnels. While these limitations don’t currently affect my project, I wanted to learn how to use DDNS.
My first step was researching which DDNS provider to implement. I decided to use timothymiller/cloudflare-ddns, a Cloudflare-focused DDNS provider with multiple features packaged as a Docker container. This made it relatively easy to implement.
This is the docker-compose.yml with the implemented configuration:
services:
  cloudflare-ddns:
    image: timothyjmiller/cloudflare-ddns:latest
    container_name: cloudflare-ddns
    network_mode: "host"
    security_opt:
      - no-new-privileges:true
    volumes:
      - ./config.json:/config.json:ro
    restart: unless-stopped
And the JSON configuration file:
{
  "cloudflare": [
    {
      "authentication": {
        "api_token": <CLOUDFLARE API TOKEN>
      },
      "zone_id": <CLOUDFLARE ZONE ID>,
      "subdomains": [
        { "name": "media", "proxied": true },
      ]
    }
  ],
  "a": true,
  "aaaa": true,
  "purgeUnknownRecords": false,
  "ttl": 300
}
For this implementation, it was necessary to generate an API KEY capable of creating/modifying DNS records in Cloudflare. The DDNS service’s job is to periodically inform Cloudflare of the public IP address where requests for that subdomain/domain should be directed.
With this in place, we can now:
- Stop the Cloudflare Tunnels container
- Delete the DNS records created by the tunnel
- Start the cloudflare-ddns container to generate/modify DNS records in Cloudflare

We can observe that in this implementation, there’s mention of proxy redirection. Since we’re no longer using Cloudflare Tunnels, we must implement our own reverse proxy to handle requests to different subdomains (in this case, for the Jellyfin server). For this purpose, along with cloudflare-ddns, we implemented Caddy Server.
Caddy Server for reverse proxy and SSL/TLS
Cloudflare’s standard workflow ensures secure connections between browsers and servers. In the previous configuration, this meant securing connections between browsers and Cloudflare as an intermediary, and then between Cloudflare and the server.

Since we’re no longer using Cloudflare Tunnels, and the DDNS provider only tells Cloudflare which public IP to route browser requests to (in this state, accessing media.nehemiasfeliz.com or example.nehemiasfeliz.com redirects to the device’s public IP, but doesn’t know which port each requested service runs on), the connection between Cloudflare and the server remains unsecured.
To solve these issues, we implemented Caddy Server. This will handle redirecting server requests based on the requesting subdomain, while also securing the connection between Cloudflare and the server by managing the SSL/TLS certificates provided by Cloudflare.
Reverse proxy
Caddy Server can also be implemented via Docker. It only requires a Caddyfile specifying how to handle incoming external requests.
This is how I implemented the docker-compose.yml for the container:
services:
  caddy:
    image: caddy:latest
    container_name: caddy-reverse
    ports:
      - "80:80"
      - "443:443"
    volumes:
      - ./Caddyfile:/etc/caddy/Caddyfile:ro
      - caddy_data:/data
      - caddy_config:/config
    restart: unless-stopped
volumes:
  caddy_data:
  caddy_config:
And this is how the caddyfile is configured to handle requests. In this case, it simply converts all HTTP requests to HTTPS (secure connection) and redirects requests for the media. subdomain to the server’s local IP and the port where Jellyfin is running:
:80 {
  redir https://{host}{uri} permanent
}

media.nehemiasfeliz.com {
    reverse_proxy 192.168.1.19:8096
}
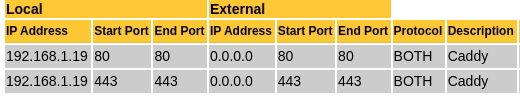
Part of the configuration involves opening ports 80 (HTTP connections) and 443 (HTTPS connections) on the router (as previously done for the initial Jellyfin setup) so Caddy can manage these requests.
SSL/TLS
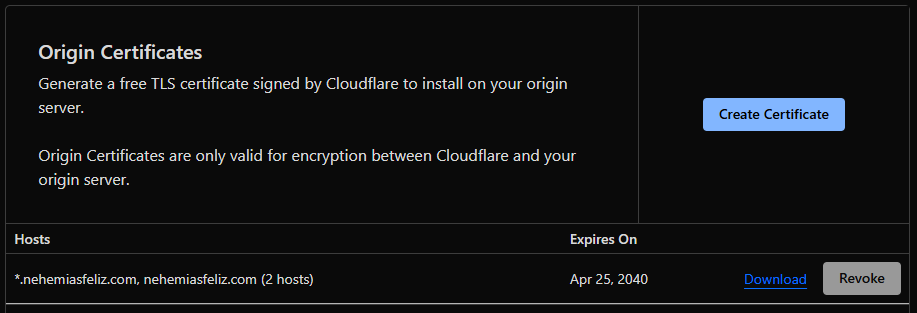
To address security, we implemented SSL/TLS - essentially encrypting the connection using certificates generated from “cryptographic files.” Cloudflare provides these files (Cloudflare’s Origin CA) for cases like this where Cloudflare Tunnels aren’t used, maintaining protection between Cloudflare and the server.
Caddy manages these certificates files by simply specifying their location both in the container and in the caddyfile.
docker-compose.yml
services:
  caddy:
    image: caddy:latest
    container_name: caddy-reverse
    ports:
      - "80:80"
      - "443:443"
    volumes:
      - ./Caddyfile:/etc/caddy/Caddyfile:ro
      - ./cloudflare-origin/cert.pem:/etc/caddy/cloudflare-origin/cert.pem:ro
      - ./cloudflare-origin/key.pem:/etc/caddy/cloudflare-origin/key.pem:ro
      - caddy_data:/data
      - caddy_config:/config
    restart: unless-stopped
volumes:
  caddy_data:
  caddy_config:
caddyfile
:80 {
  redir https://{host}{uri} permanent
}

media.nehemiasfeliz.com {
    tls /etc/caddy/cloudflare-origin/cert.pem /etc/caddy/cloudflare-origin/key.pem
    reverse_proxy 192.168.1.19:8096
}
With this implementation, we can configure Cloudflare to use “Full (Strict)” encryption between Cloudflare and the server.
Full (Strict): Enable encryption end-to-end and enforce validation on origin certificates. Use Cloudflare’s Origin CA to generate certificates for your origin.
Through the combination of cloudflare-ddns and Caddy Server, we can now manage both subdomains and server connection security without Cloudflare Tunnels’ limitations. This provides greater control and scalability, allowing quick addition/removal of subdomains without manual Cloudflare portal access.
Transcoding And Hardware Acceleration on Jellyfin
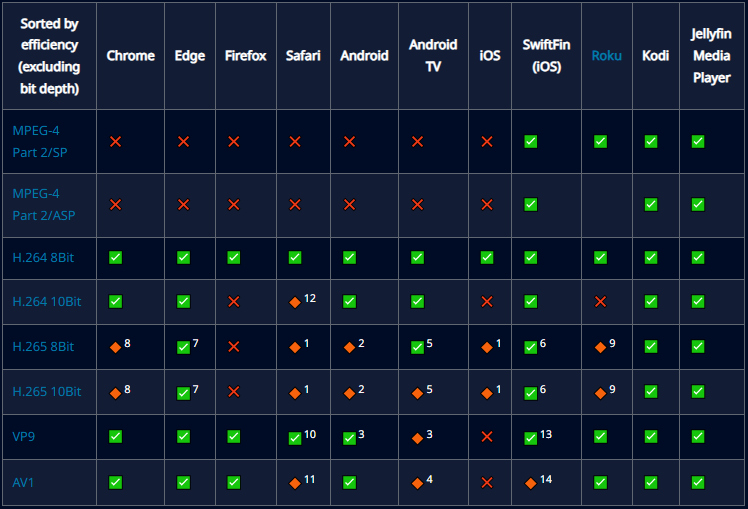
The great thing about Jellyfin being open-source is that clients have been developed for all platforms and operating systems. However, one issue that arises when trying to play a video on each of these devices/platforms is that not all of them can natively play the video because its format (video, audio, subtitles) is not compatible with that specific device/platform. Here’s an example of the compatibility of different video formats supported across platforms:
To solve this problem, Jellyfin is capable of “transforming” these videos into a format that the device can play. This process is known as Transcoding. Transcoding is a process that uses the CPU for conversion, but this process can be accelerated by using a GPU, which is called Hardware Acceleration.
In the case of my laptop, it doesn’t have a dedicated graphics card. Instead, the CPU (Intel Core i3-3227U @ 1.90 GHz x4) has an Integrated GPU (Intel Ivybridge (Gen7) /Mesa Intel HD Graphics 4000 - 1.5GB). According to the documentation, I need to tell the Docker container where the driver responsible for video rendering is located and grant it the privileges of the “render”/”video” groups so it can manage the driver.
But a problem arises when trying to integrate this with Docker Desktop.
from Docker Desktop to Docker Engine CLI
Docker allows you to install a GUI to manage containers/images/volumes, called Docker Desktop, which is what I had been using until now. However, according to its documentation, installing Docker Desktop creates a virtual machine (VM). This prevents the use of devices external to that virtual machine officially, without resorting to complex and not always secure workarounds (in addition to consuming more system resources).
Due to this drawback, I decided to migrate from Docker Desktop to the system-integrated version, Docker Engine CLI. The process involved backing up the volumes (data), recreating the containers, and replacing the content of the new volumes with the data from the old ones. With the CLI i’m able to monitor the container and more options, since then i only use the CLI

Now, with this change, the Jellyfin container can access the video driver without issues. Furthermore, it is no longer limited by the VM’s constraints and operates more efficiently for the system.
Implementation
With that issue resolved, the next step is the implementation and activation of Hardware Acceleration in the Jellyfin container.
First, we need to determine which hardware acceleration methods are supported by Jellyfin. The supported and validated video hardware acceleration (HWA) methods are:
- Intel Quick Sync Video (QSV)
- NVIDIA NVDEC/NVENC (NVENC)
- AMD Advanced Media Framework (AMF)
- Intel/AMD Video Acceleration API (VA-API, Linux only)
- Apple Video Toolbox (macOS only)
- Rockchip RKMPP (Linux only)
Since we know our integrated graphics card is an Intel, we have the following methods available on Linux::
- QSV - Preferred on mainstream GPUs, for better performance
- VA-API - Required by pre-Broadwell legacy GPUs, for compatibility
Given that my CPU/GPU is a fairly old Intel model, I will choose VA-API.
For these video drivers to be used, they must first be installed on the system:
$ sudo apt update

$ apt search va-driver
i965-va-driver/oldstable,now 2.4.1+dfsg1-1 amd64
  VAAPI driver for Intel G45 & HD Graphics family

intel-media-va-driver/oldstable,now 23.1.1+dfsg1-1 amd64
  VAAPI driver for the Intel GEN8+ Graphics family

mesa-va-drivers/oldstable,now 22.3.6-1+deb12u1 amd64
  Mesa VA-API video acceleration drivers

va-driver-all/oldstable,now 2.17.0-1 amd64
  Video Acceleration (VA) API -- driver metapackage

# Install all available drivers just in case, as well as the necessary tools
$ sudo apt install -y i965-va-driver intel-media-va-driver mesa-va-drivers va-driver-all vainfo intel-gpu-tools

# Confirm the driver files have been generated
$ ls -l /dev/dri
total 0
drwxr-xr-x  2 root root         80 jul 20 10:55 by-path
crw-rw----+ 1 root video  226,   0 jul 20 10:55 card0
crw-rw----+ 1 root render 226, 128 jul 20 10:55 renderD128 # this one is the important

# Confirm the Render group number
$ getent group render | cut -d: -f3
105
For now, we can integrate the driver into the Jellyfin container by adding the necessary device mapping and group privilege to its Docker compose file:
services:
  jellyfin:
    image: jellyfin/jellyfin:10.10.7
    container_name: jellyfin
    user: 1000:1000
    network_mode: 'host'
    # Mount the VA device
    devices:
      - /dev/dri:/dev/dri
    # Grant it the privileges of the "render"/"video" groups
    group_add:
      - video
      - '105'
    volumes:
      - config:/config
      - cache:/cache
      - type: bind
        source: /mnt/storage
        target: /USB
    restart: 'unless-stopped'
    environment:
      - JELLYFIN_PublishedServerUrl=https://media.nehemiasfeliz.com/
      - OpenApi__Enabled=true
      - TZ=America/Santo_Domingo
    extra_hosts:
      - 'host.docker.internal:host-gateway'
volumes:
  config:
  cache:
For the changes to take effect, we must recreate the container:
$ docker compose down && docker compose up -d
Configuration
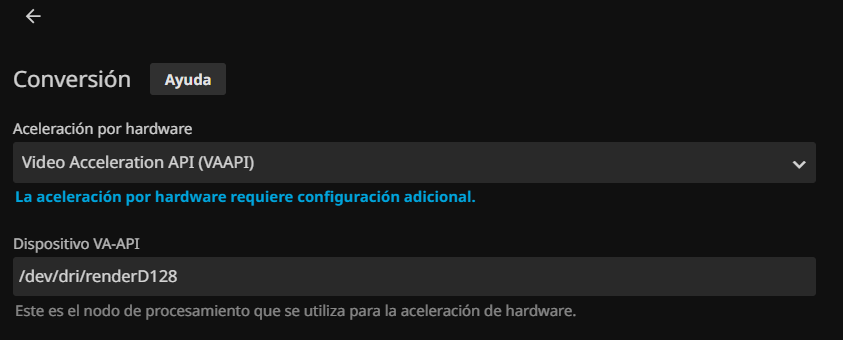
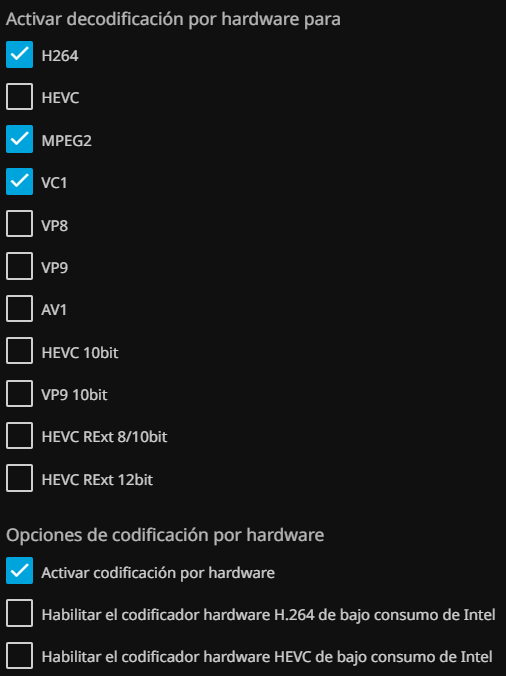
With the container now running, we can go to the Jellyfin settings to activate Hardware Acceleration: Dashboard -> Playback -> Transcoding. In this case, we choose the VA-API option and tell it where the device is located (As we saw earlier, it’s at /dev/dri/renderD128)
The next part of the configuration is to determine which video codecs the device will be able to use. To check this, we can run the following commands:
$ vainfo
libva info: VA-API version 1.17.0
libva info: Trying to open /usr/lib/x86_64-linux-gnu/dri/iHD_drv_video.so
libva info: Found init function __vaDriverInit_1_17
libva error: /usr/lib/x86_64-linux-gnu/dri/iHD_drv_video.so init failed
libva info: va_openDriver() returns 1
libva info: Trying to open /usr/lib/x86_64-linux-gnu/dri/i965_drv_video.so
libva info: Found init function __vaDriverInit_1_8
libva info: va_openDriver() returns 0
vainfo: VA-API version: 1.17 (libva 2.12.0)
vainfo: Driver version: Intel i965 driver for Intel(R) Ivybridge Mobile - 2.4.1
vainfo: Supported profile and entrypoints
      VAProfileMPEG2Simple            :	VAEntrypointVLD
      VAProfileMPEG2Simple            :	VAEntrypointEncSlice
      VAProfileMPEG2Main              :	VAEntrypointVLD
      VAProfileMPEG2Main              :	VAEntrypointEncSlice
      VAProfileH264ConstrainedBaseline:	VAEntrypointVLD
      VAProfileH264ConstrainedBaseline:	VAEntrypointEncSlice
      VAProfileH264Main               :	VAEntrypointVLD
      VAProfileH264Main               :	VAEntrypointEncSlice
      VAProfileH264High               :	VAEntrypointVLD
      VAProfileH264High               :	VAEntrypointEncSlice
      VAProfileH264StereoHigh         :	VAEntrypointVLD
      VAProfileVC1Simple              :	VAEntrypointVLD
      VAProfileVC1Main                :	VAEntrypointVLD
      VAProfileVC1Advanced            :	VAEntrypointVLD
      VAProfileNone                   :	VAEntrypointVideoProc
      VAProfileJPEGBaseline           :	VAEntrypointVLD

$ docker exec -i -t jellyfin /usr/lib/jellyfin-ffmpeg/ffmpeg -codecs | grep libx264
  configuration: --prefix=/usr/lib/jellyfin-ffmpeg --target-os=linux --extra-version=Jellyfin --disable-doc --disable-ffplay --disable-ptx-compression --disable-static --disable-libxcb --disable-sdl2 --disable-xlib --enable-lto=auto --enable-gpl --enable-version3 --enable-shared --enable-gmp --enable-gnutls --enable-chromaprint --enable-opencl --enable-libdrm --enable-libxml2 --enable-libass --enable-libfreetype --enable-libfribidi --enable-libfontconfig --enable-libharfbuzz --enable-libbluray --enable-libmp3lame --enable-libopus --enable-libtheora --enable-libvorbis --enable-libopenmpt --enable-libdav1d --enable-libsvtav1 --enable-libwebp --enable-libvpx --enable-libx264 --enable-libx265 --enable-libzvbi --enable-libzimg --enable-libfdk-aac --arch=amd64 --enable-libshaderc --enable-libplacebo --enable-vulkan --enable-vaapi --enable-amf --enable-libvpl --enable-ffnvcodec --enable-cuda --enable-cuda-llvm --enable-cuvid --enable-nvdec --enable-nvenc
 DEV.LS h264                 H.264 / AVC / MPEG-4 AVC / MPEG-4 part 10 (decoders: h264 h264_v4l2m2m h264_qsv h264_cuvid) (encoders: libx264 libx264rgb h264_amf h264_nvenc h264_qsv h264_v4l2m2m h264_vaapi)
We can confirm that the integrated graphics card can handle: H264, MPEG2, and VC1. Therefore, we will select those in the configuration.
Some settings I configured to minimize the workload during transcoding as much as possible were to limit the number of CPU cores to use and set a limit on the buffer to convert during playback.
Verify
Finally, we can verify how the graphics card is working using intel_gpu_top (from intel-gpu-tools):
$ sudo apt update && sudo apt install -y intel-gpu-tools
$ sudo intel_gpu_top
The GPU when no transcoding processes are being performed

vs. when processes are being performed
