Local Media Server part 3
Now’s a good time to say that I consider myself someone who enjoys anime quite a bit, and therefore, over the course of my life, I’ve built up a collection of anime on my computers. So, since the second post, I decided to add another server dedicated to better managing my anime series on Jellyfin.
Shoko Server
Although jellyfin can “detect” which series the files belong to based on the name of the folder/files themselves using plugins, it doesn’t always work and organizing series with multiple seasons requires a specific and tedious structure and configuration, and since the seasons of an anime are not named numerically/sequentially (example), determining the order is entirely up to you.
Based on that need for organization, I began researching how to organize my series more efficiently and automatically. The research led to the solution: Shoko. An open-source system that automates series organization for media centers like Jellyfin or Plex.
The main characteristic of Shoko is the following:
Shoko streamlines your anime collection by hashing your files and matching them against AniDB’s comprehensive database. It automatically fills your collection with detailed information about each series and episode, while also pulling in metadata from other sources.1
In addition to handling duplicates, missing, corrupt/incomplete files, among other things. But what interests us about Shoko is that it will organize the series in the way that Jellyfin expects them (structure and metadata), allowing us to get rid of the task of manual organization.
Instaling the server
Shoko offers a Docker image for installation on Linux systems, which is very convenient since we’ve been working with containers so far. As always, we will create a docker compose file to create the container (the docs offers a Docker Compose Builder).
# docker-compose.yml
services:
  shoko_server:
    shm_size: 256m
    container_name: shoko_server
    image: ghcr.io/shokoanime/server:v5.1.0
    restart: always
    environment:
      - "PUID=$UID"
      - "PGID=$GID"
      - "TZ=UTC-4"
    ports:
      - "8111:8111"
    volumes:
      - "config:/home/shoko/.shoko"
      - "/mnt/storage:/mnt/anime"
volumes:
  config:
With that we can access the server through the browser by accessing http://localhost:8111
Configuring the server
The documentation details how to configure the server, create users, select the folder with the files to analyze, and connect to AniDB.
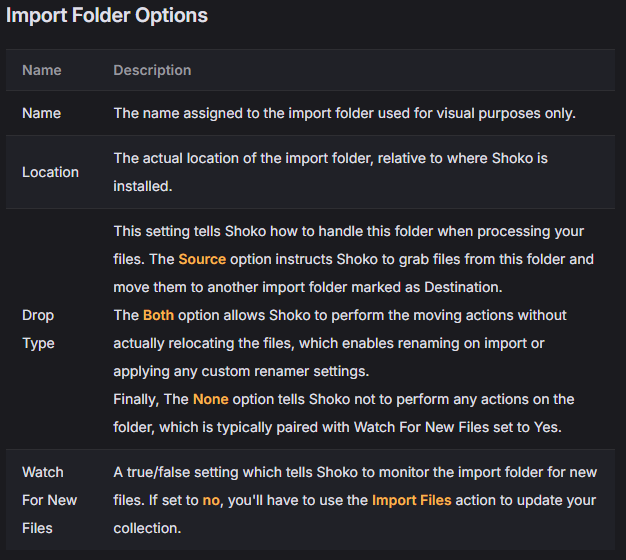
I’ll only explain how I configured the folder to use with Shoko. The documentation discusses the different ways Shoko interacts with the folder and its files:
- Watch: It only watches and analyzes the files without making any changes to them or their folders.
- Drop Source: Analyzes the files, modifies them (renames and changes the folder structure), and sends them to the Drop Destination.
- Drop Destination: Responsible for storing the files/folders for consumption.
When adding/modifying which folders to use, Shoko offers the following options:
In my case, since I don’t want to modify the names or structure of the files (I’ll explain why later), I configured my folder like this:
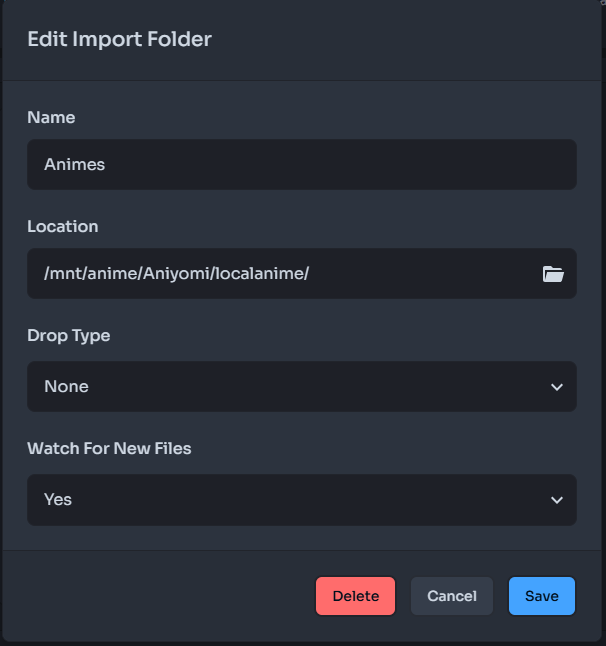
With that, Shoko is now able to automatically analyze and organize my series. All that’s left is to integrate Shoko into Jellyfin so it can take advantage of Shoko’s organization to present the series efficiently. But first, I want to talk a little about AniDB.
AniDB
As Shoko’s documentation mentions:
AniDB is a free and comprehensive anime database and file tracker, heavily utilized by Shoko to provide metadata for the series and files in your collection. Currently, AniDB is required to use Shoko, so you’ll need to create an account if you don’t already have one.
But generally speaking, AniDB is one of the sites known as “trackers” for anime series. But unlike Anilist or Myanimelist, AniDB focuses on the files themselves.
The same episode of a series can have differences (quality, subtitles, length, size, etc.). These differences are reflected in what we call HASH. An episode released by Netflix will have a different HASH than one released by Crunchyroll or a particular individual. An example of this can be seen with episode 1 of the first season of Dandadan:
- Netflix: 9aa6b701
- Crunchyroll: 934805ac
- WZF: 44c378b0
So in the end, apart from keeping track of the anime you’ve watched, you can also know exactly where those files you have are from. Shoko analyzes the files you own to find their hashes and compares them with files known to AniDB. This way, it doesn’t depend on the file name, but rather on the file hash.
Since Shoko uses your AniDB account to analyze files, when it detects them, it can add them to your anime list and even report if they’ve been viewed or delete them if they’re no longer available.
Note: Not all of your files may be registered in AniDB and therefore not recognized by Shoko, but Shoko helps you register them in AniDB (Registering files has its rules 1 2 and is not always recommended unless you know what you are doing) and thus be recognized by Shoko. Or simply manually indicate which anime/episode the file belongs to (This registers them in AniDB as generic files).
I only mention this because I’m a big fan of keeping track of the things I watch/own, and I’ve added files to AniDB myself.
Now, let’s integrate Shoko into Jellyfin.
Integrating Shoko with Jellyfin
To enable Jellyfin, there are a few steps involved, but generally it involves telling Jellyfin where the folder is, and Shoko will virtually restructure the folders and files the way Jellyfin needs them.
To implement this integration, Shoko offers a Jellyfin plugin called Shokofin that acts as a bridge between Shoko and Jellyfin.
Installing the Plugin
Shoko’s documentation shows how to install the plugin on Jellyfin. For that we go to Dashboard -> Catalog -> Adjust (Gear) -> Add (+). We add an identifying name, in my case “Shokofin Stable” and the link to the JSON file provided by Shoko. We save the changes. This shows the repository and the plugin in the catalog:


After installing it, we restart the Jellyfin server so that the plugin finishes installing.
Configuring the Plugin
After the restart we access Dashboard -> My plugins -> Shokofin (the 3 points) -> settings.
Shoko’s documentation explains all the plugin’s options quite well. But to simplify things, I’ll explain the options I selected to adapt it to my needs.
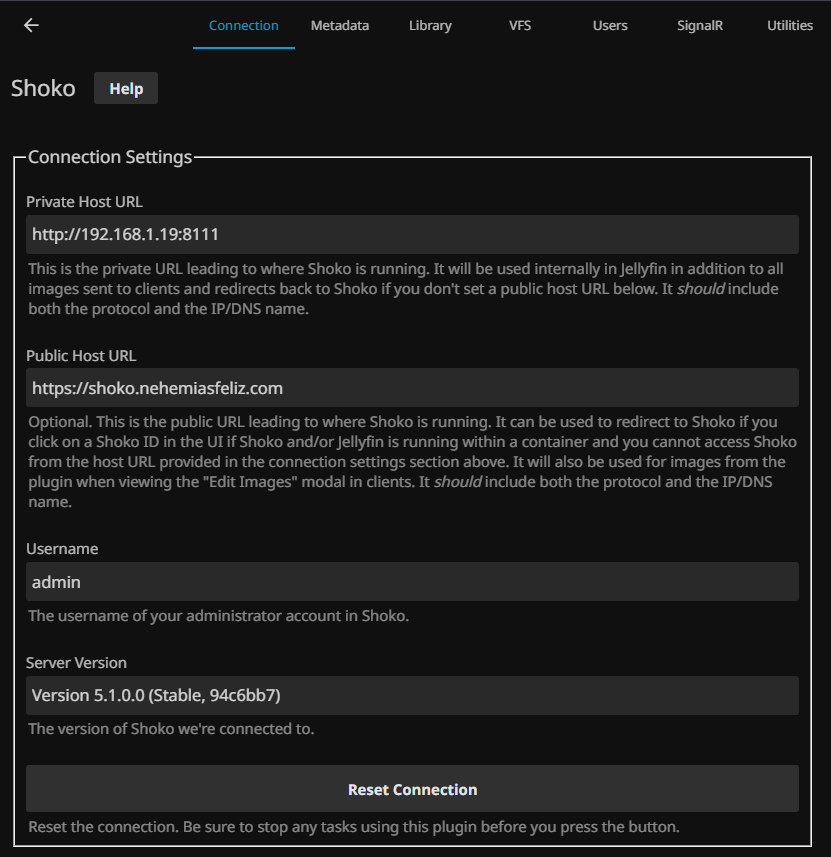
Here I simply indicated the local IP and the port on which Shoko is working as well as the username and password for authentication.
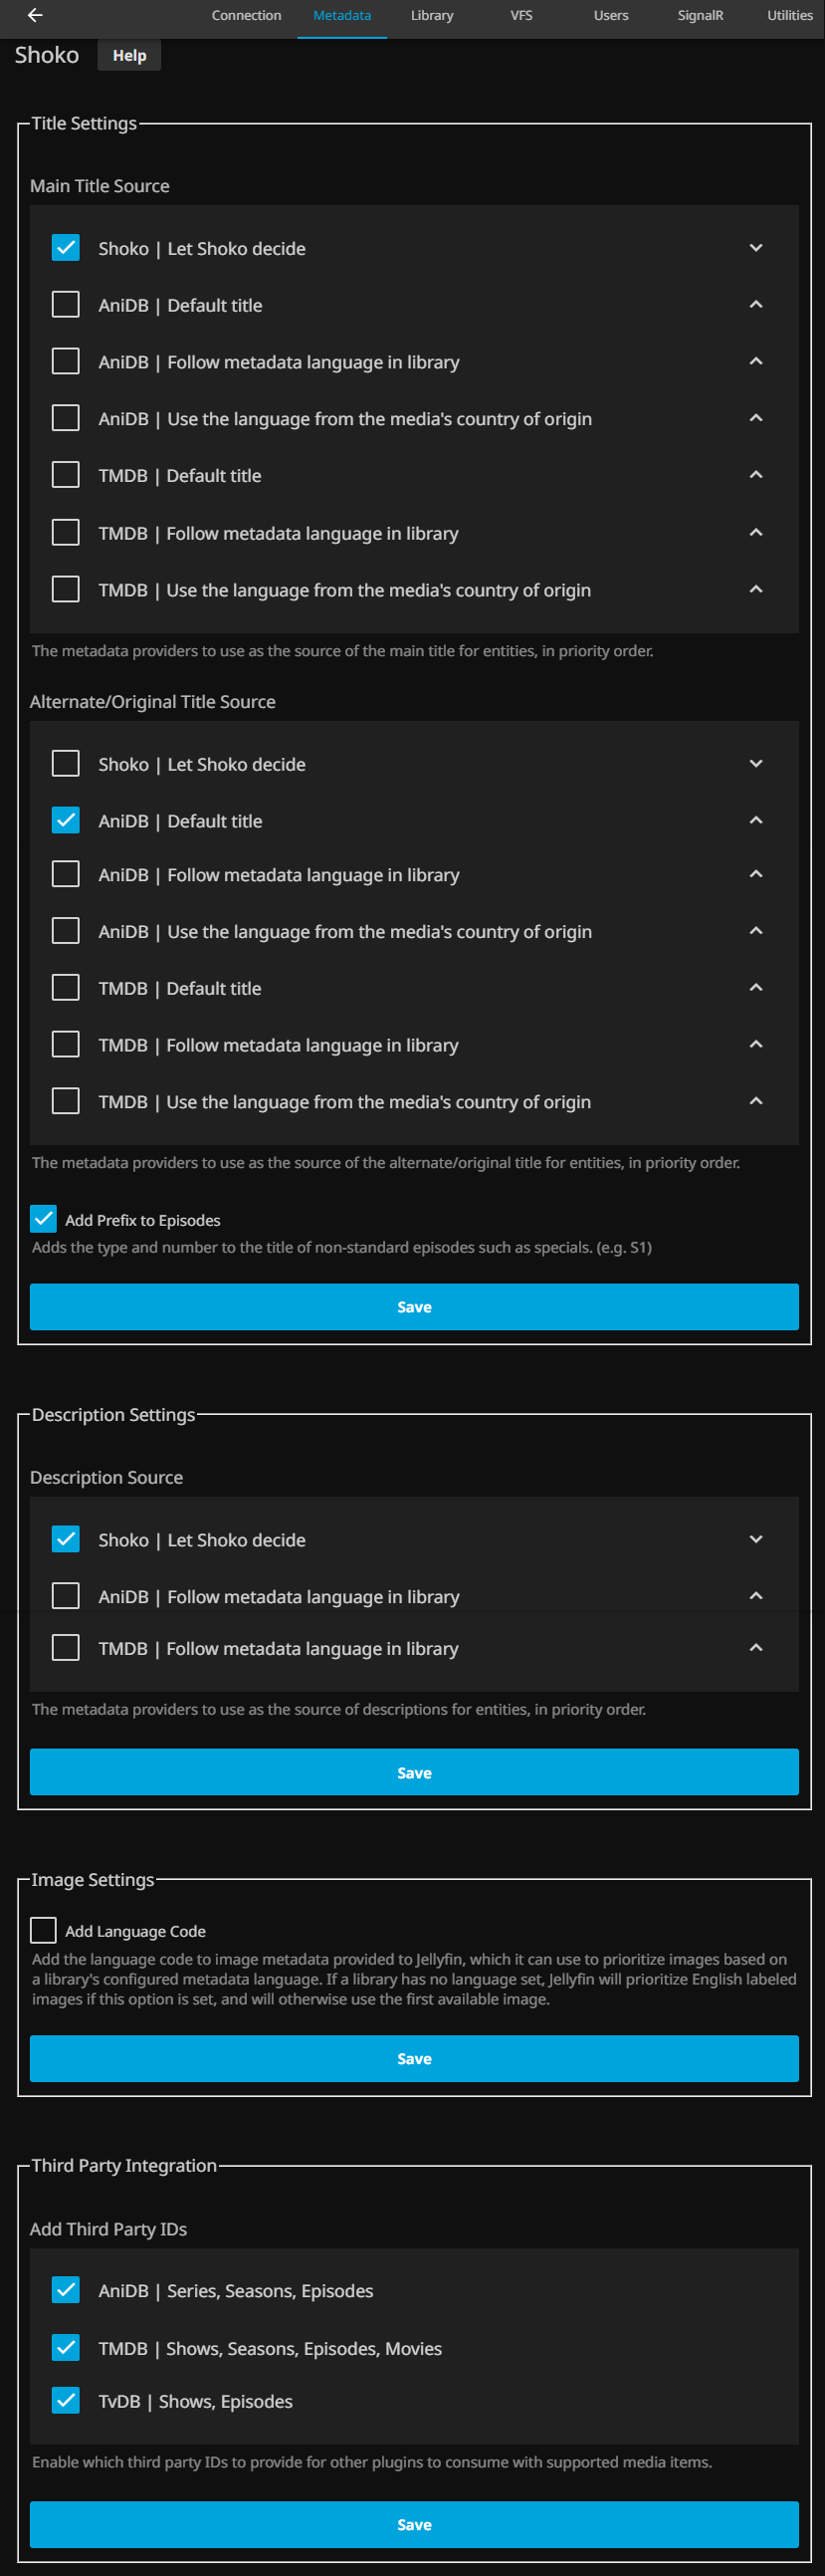
In this section, I’ve set the main title of the series/season/episode/description to be adapted to Shoko’s specifications (in my case, Spanish/English/Romanji) and the alternate title to be decided by AniDB (mainly Romanji). I’ve also set useful links.
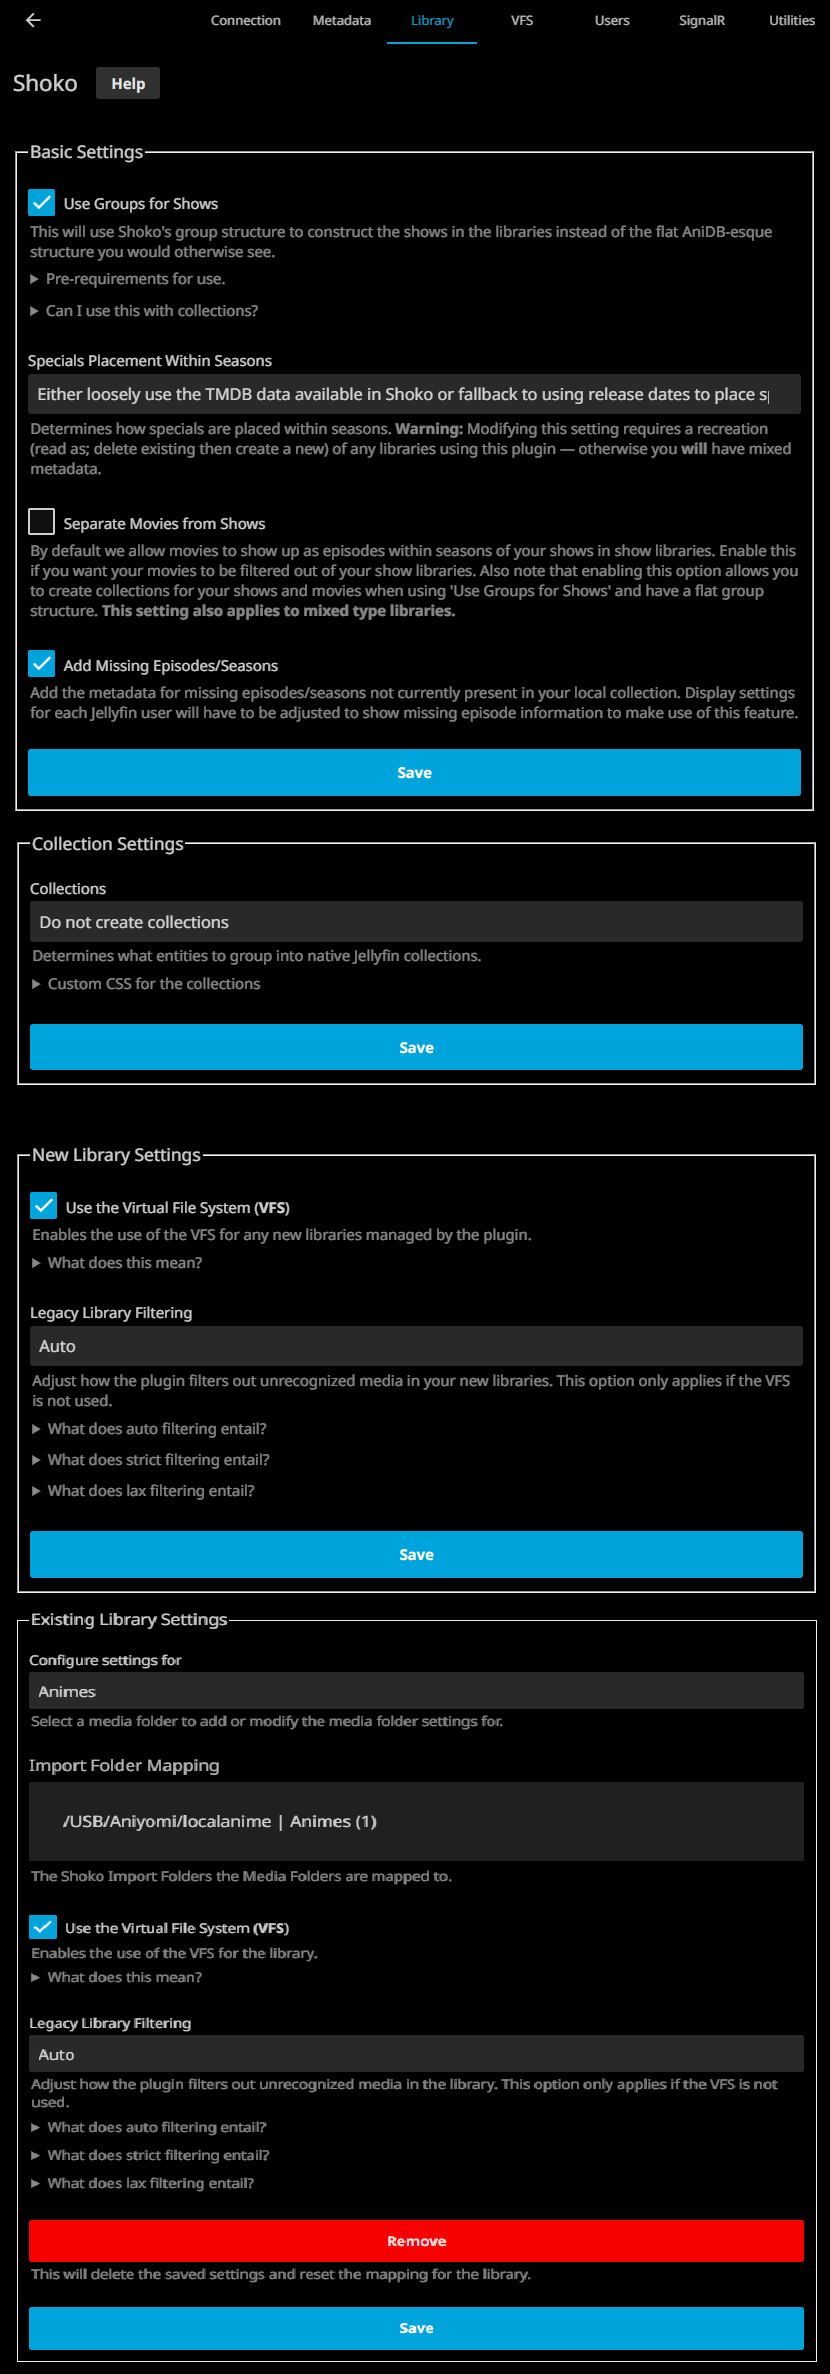
In this section, the most important thing is to enable VFS for libraries created using Shokofin. The plugin itself describes what it consists of:
Enabling this feature allows you to disregard the underlying disk file structure while automagically meeting Jellyfin’s requirements for file organization. It also ensures that no unrecognized files appear in your library and allows us to fully leverage Jellyfin’s native features better than we otherwise could without it. This enables us to effortlessly support trailers, special features, and theme videos for series, seasons and movies, as well as merge partial episodes into a single episode. All this is possible because we disregard the underlying disk file structure to create our own using symbolic links. 1
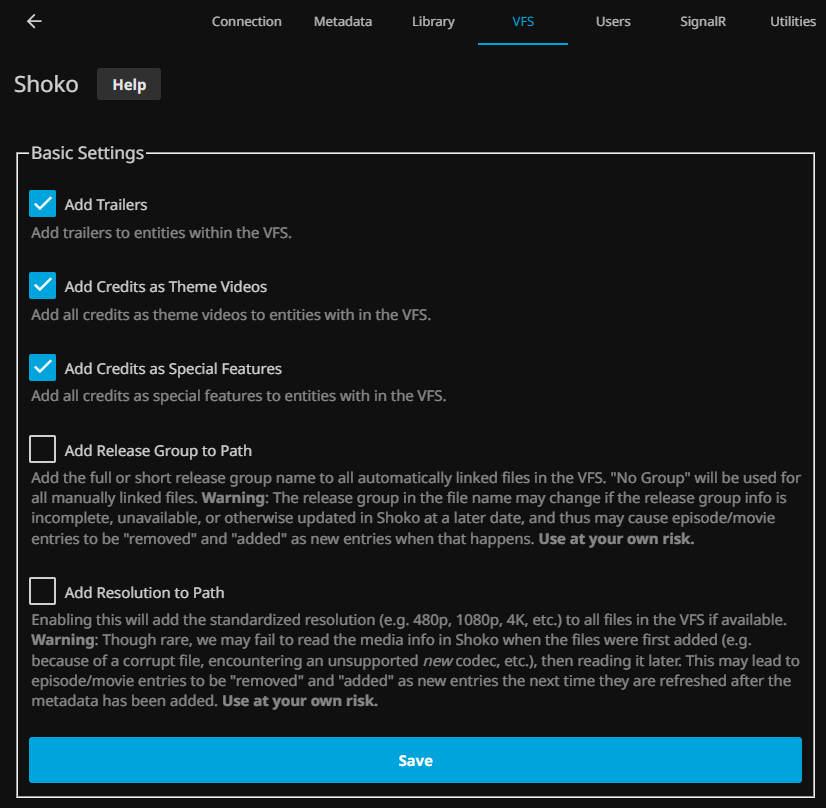
This section is not so interesting, but basically it is what elements are considered in the VFS
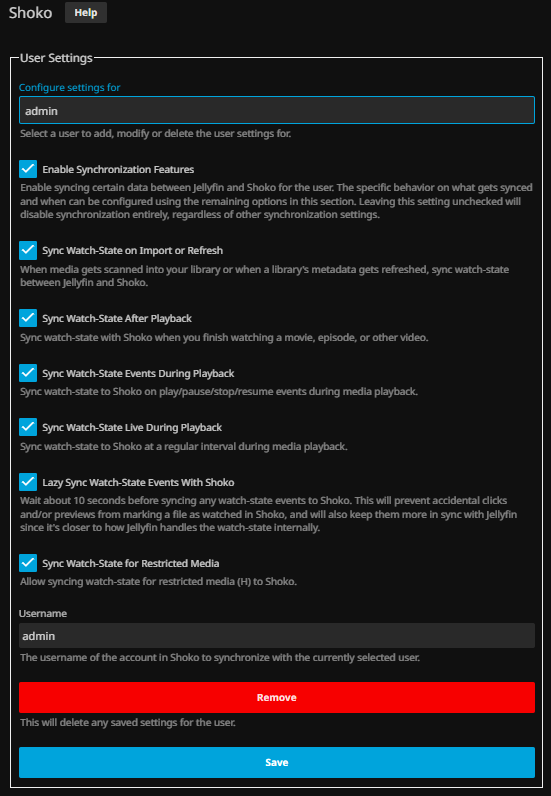
In this section, a Jellyfin user is synchronized with a Shoko user, allowing synchronization of the progress of the episodes watched with Shoko (and Shoko with AniDB).
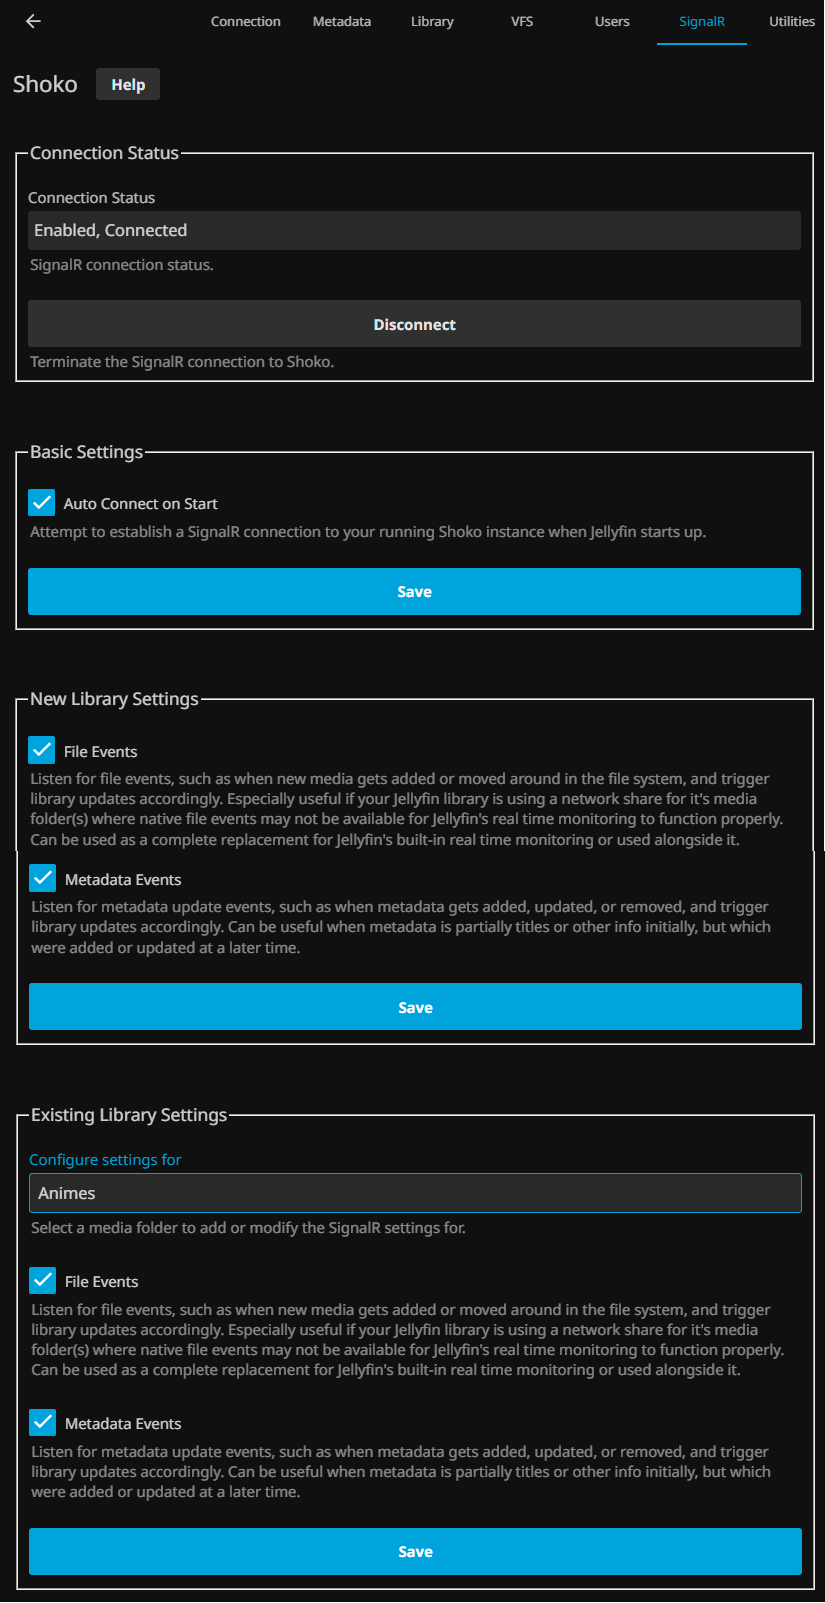
For this section, I prefer to use the description from the documentation:
SignalR is a feature that allows for real-time communication with your running Shoko Server so that Shokofin has the ability to react to certain types of events such as file events and refresh events. This means that when Shoko Server identifies new media or updates metadata for your media, Shokofin can immediately import new or update existing media in your library. 1
With that we have the plugin ready to be used in the creation of libraries
Creating a Library with Shokofin
The documentation also explains how to create the library using the Shokofin plugin as the metadata and image provider (also the VFS structure, but Shokofin does this in parallel).
Something worth mentioning is that the library must be created as a Shows/Movies or Mixed Movies and Shows library, but Shows is recommended.
In my case, I created the Show library. I indicated where the series folder is, and Shoko as the metadata and image provider. Note that below the “Original” folder is the folder created by Shokofin’s VFS; this is the one Jellyfin primarily uses to obtain series information and display them.

The result
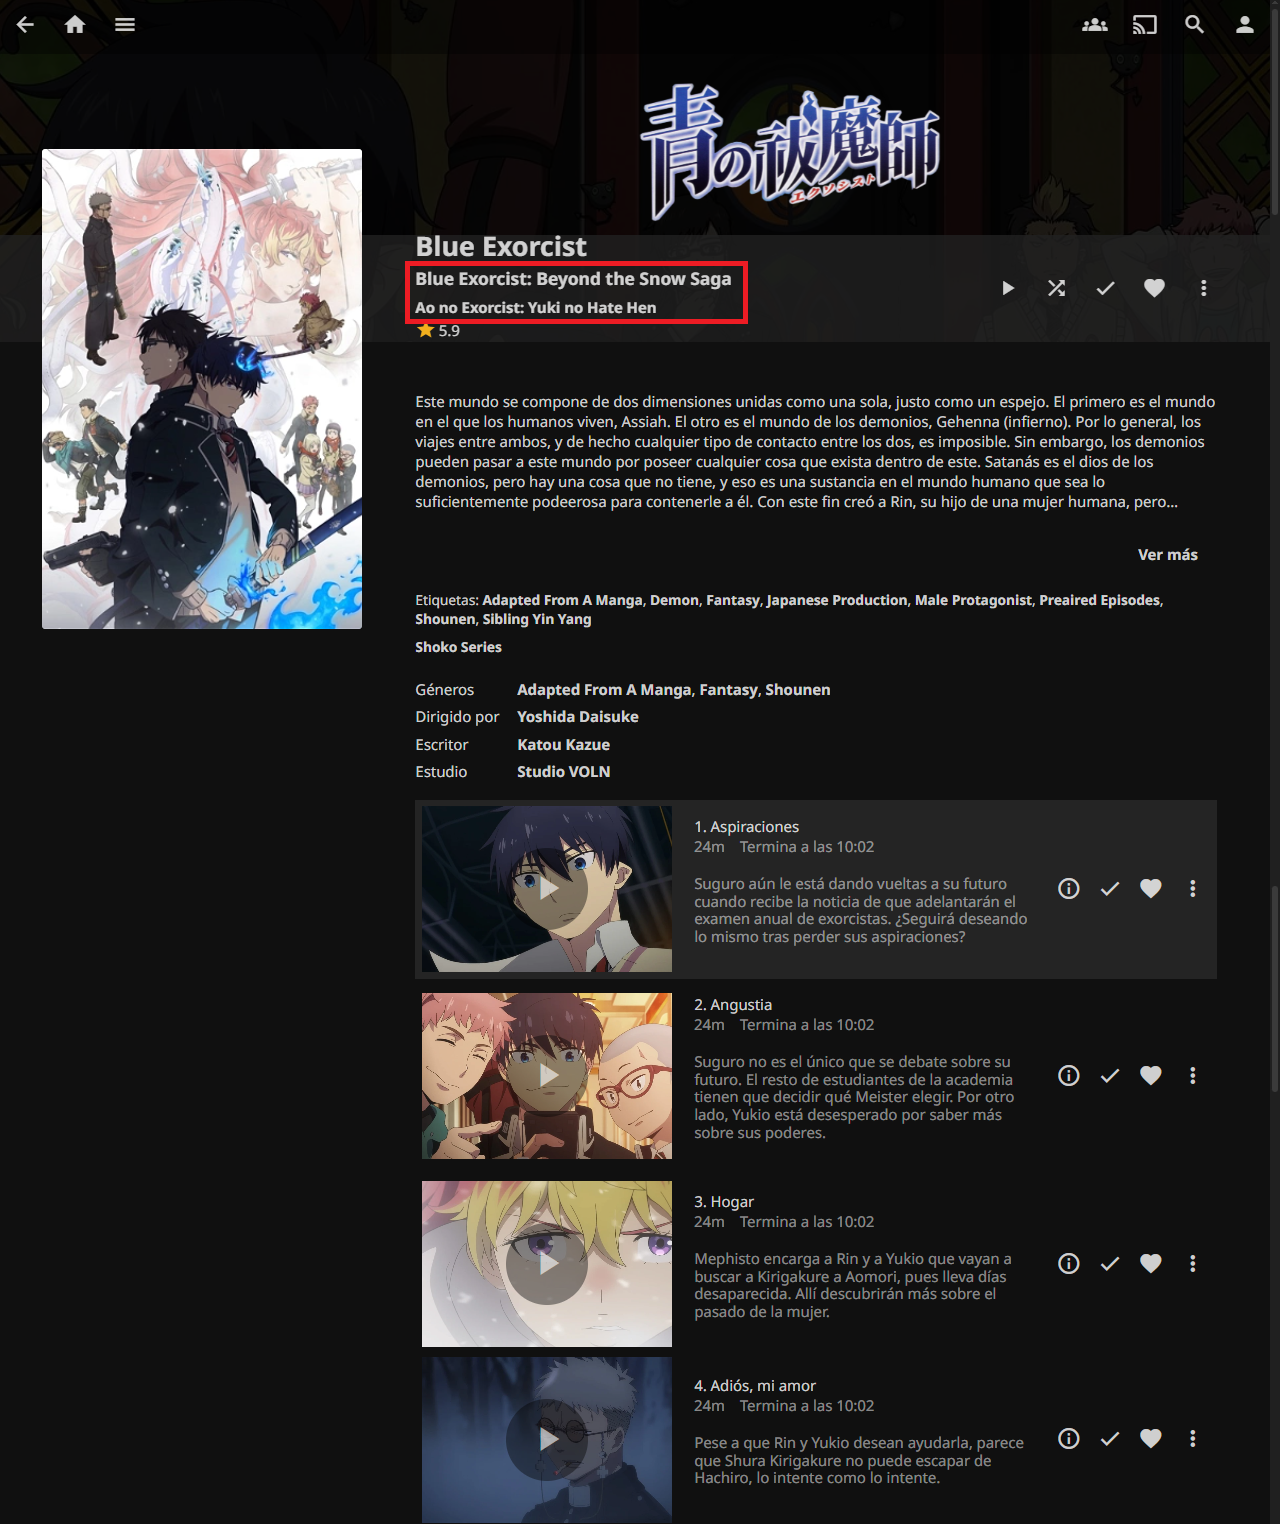
Now that the library is created and Jellyfin has finished obtaining all the metadata and images provided by Shoko, the library looks like this:
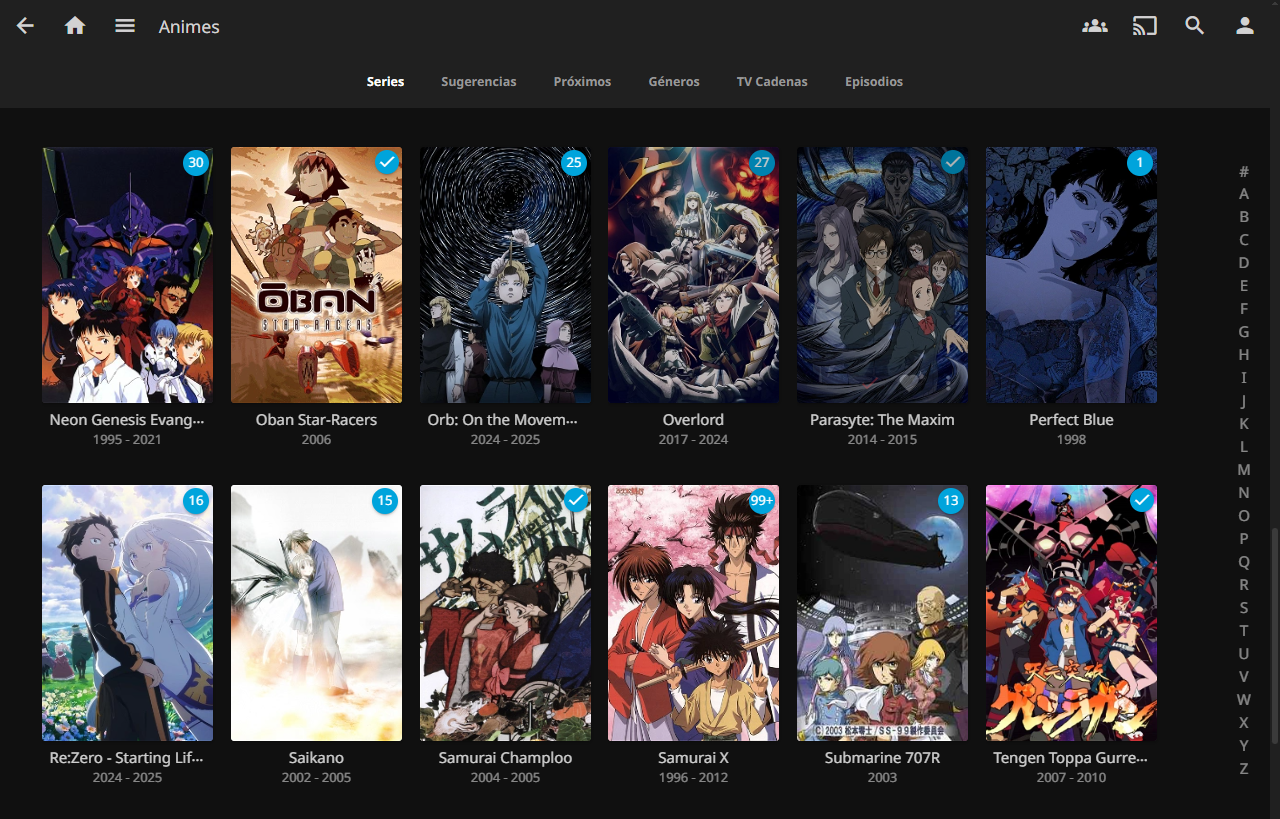
When we enter a series, we can see its title in English, followed by its alternate title in Romanji (as we configured in Shoko/Shokofin). The description is in English because one in Spanish was not found. This is also the case with the two seasons I have, sorted in order of broadcast. Shoko also provides cover art, background images, and a logo.
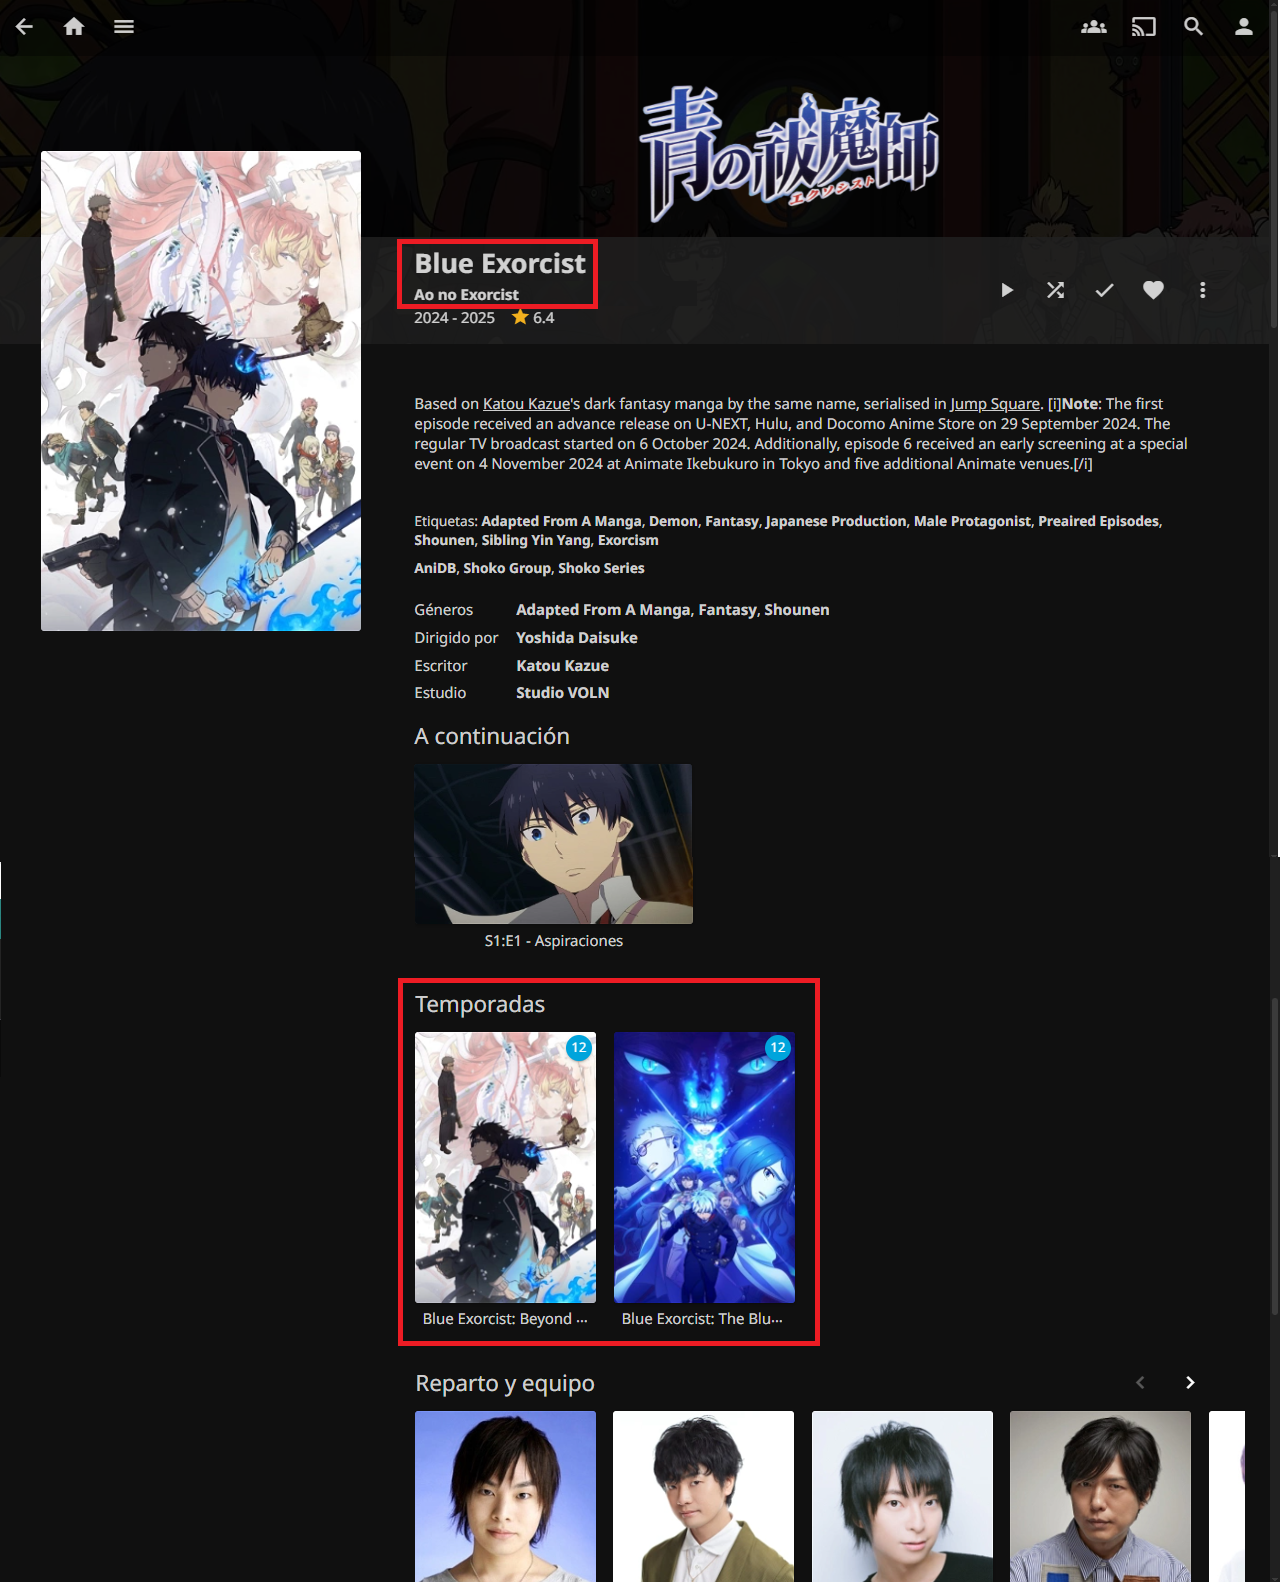
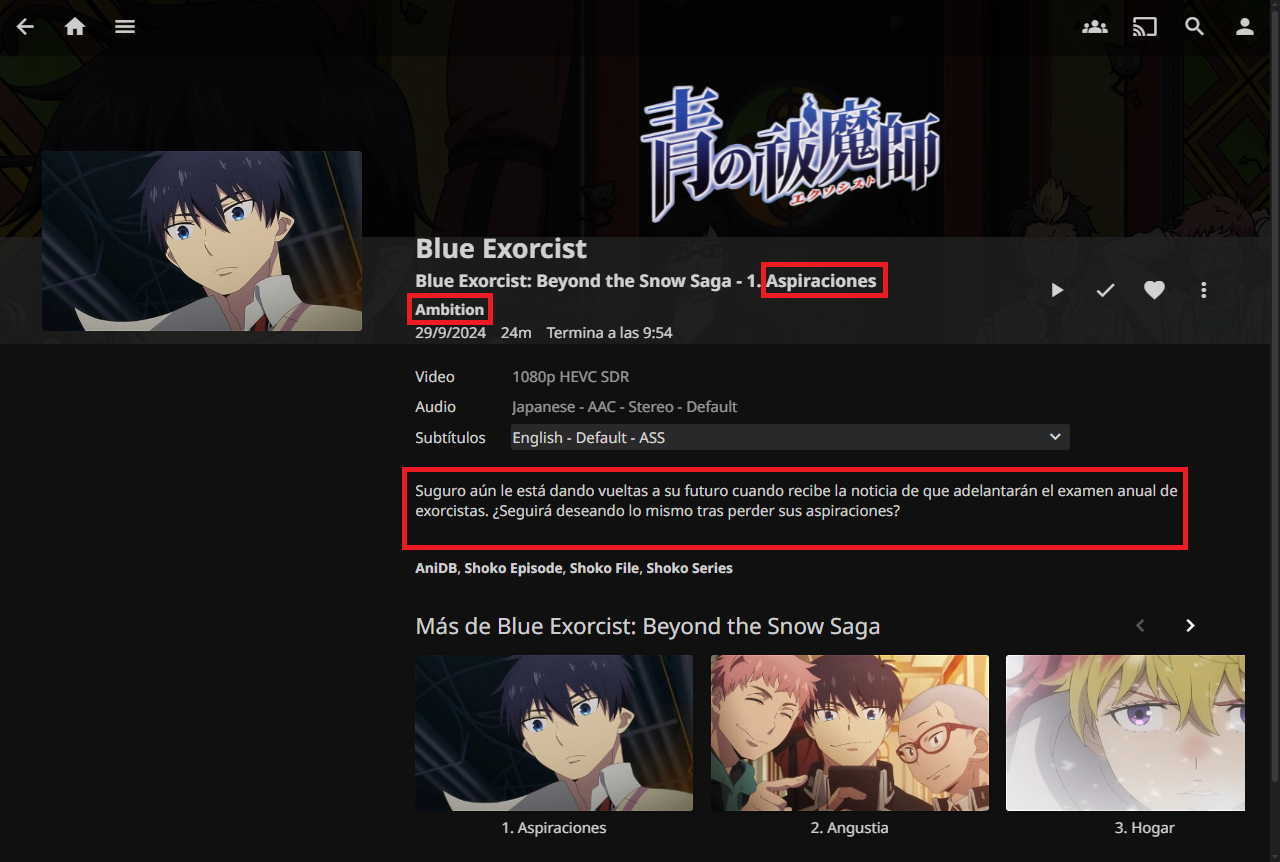
When accessing a season, we can see the title of the season in both English and Romanji, the description in Spanish this time, as well as its episodes and their descriptions.
With this, we can complete the integration of Shoko with Jellyfin. Now let’s move on to the next task: Adding content to the collection.
Getting new series
Although I already have a series collection, I also want to add new ones and follow the ones that are currently airing. To do this, I can obtain new series in two different ways (I will not put any links to those sites to avoid problems.).
Direct Download
Many editing/subtitling teams (mostly known as fansubs) publish their work on thpublish their work on the internet and enable downloading of said files through their dedicated download servers or use sites like Mediafire/Mega/1Ficher/Etc to host their files and place the links on their web pages.
There’s not much to explain here. I access the website, download the file to the folder where the other series are, and let Shoko take care of it.
Torrent
Some time later, I discovered what the BitTorrent network was and how several fansubs and others distributed their content over it. So, I started integrating it to get new series.
The first step in using the Bittorrent network is to choose a client/program that manages file downloads/uploads. Although there are several, I decided on Qbittorrent.
Qbittorrent
Qbittorrent is an open-source, cross-platform torrent client. It has several interesting features.
For installation, even though it has a Docker image, I prefer to install it directly on the system since I don’t want to limit myself to managing it solely through the browser. However, I don’t rule out migrating to the Docker image later to maintain consistency and make migrations easier.
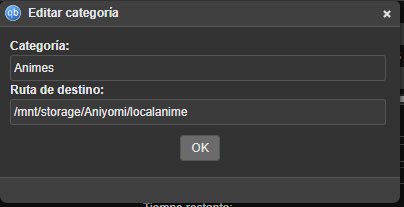
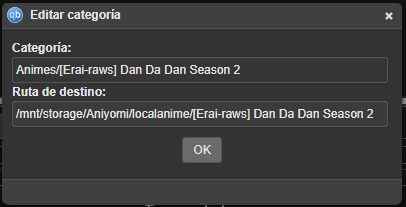
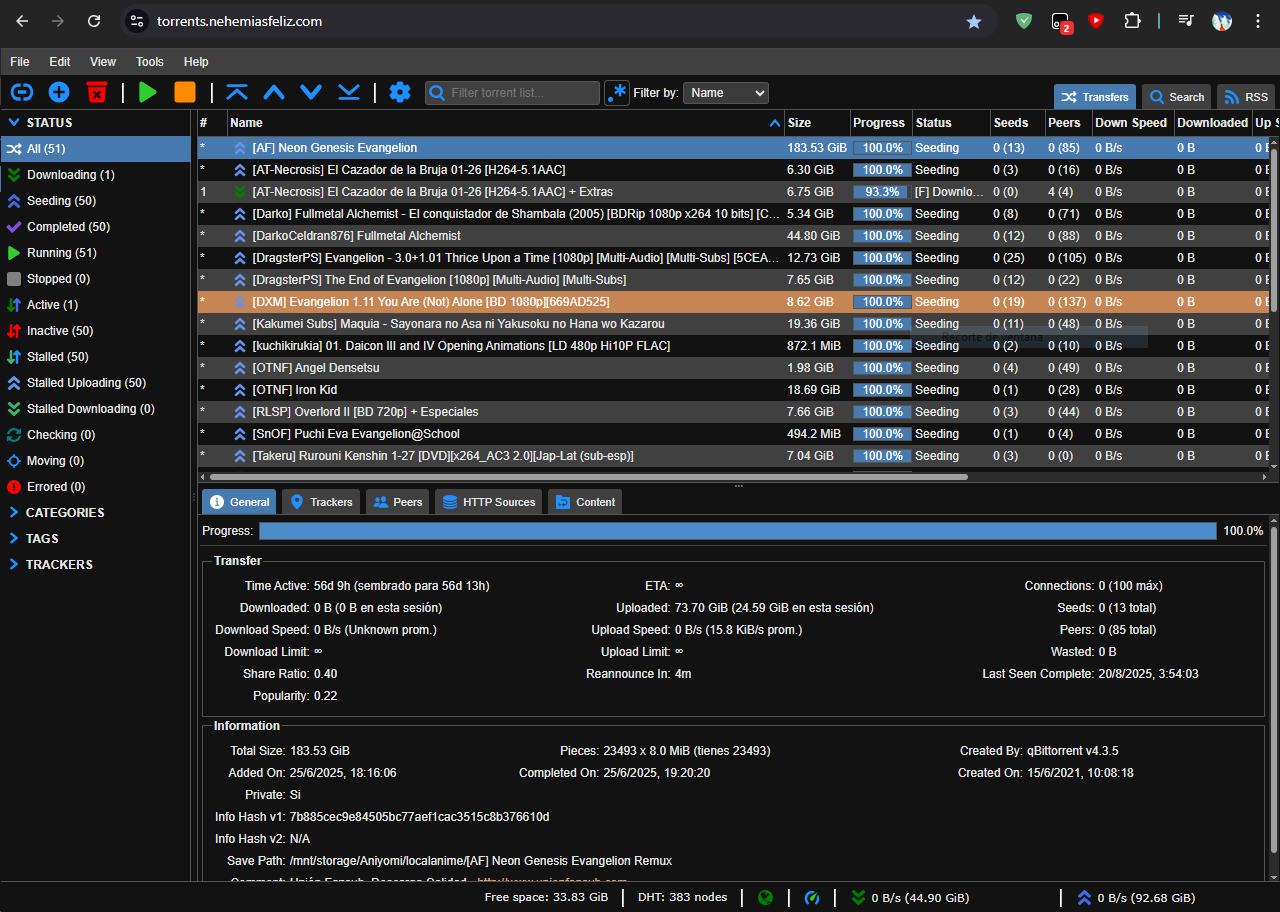
One feature allows me to create categories/subcategories for the different downloads I make. These categories establish different destinations/folders for each one. This allows me to set only torrents with the “Anime” category to download to the folder that Shoko/Jellyfin uses.
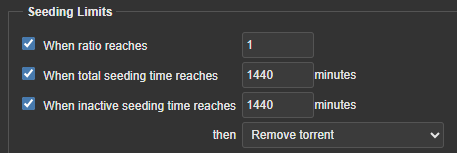
The Bittorrent network is designed to share files between peers, so it is always expected that after you obtain the file you are also willing to share, and although not everyone shares after downloading I have decided to “do my part” and share the torrents that I download for at least one day or if I have already shared the same size of the file (1 GB downloaded 1 GB uploaded, this proportion is known as Ratio). Except for series/torrents that don’t have many/no one sharing them, I share those indefinitely.
Automation of new episodes of the series currently airing
For series that are currently airing, manually searching for the new torrent of the week can be tedious. So I decided to implement other Qbittorrent features.
The first is RSS feed reading, allowing me to read the RSS feeds that various websites/fansubs offer directly from Qbittorrent to download their torrents.
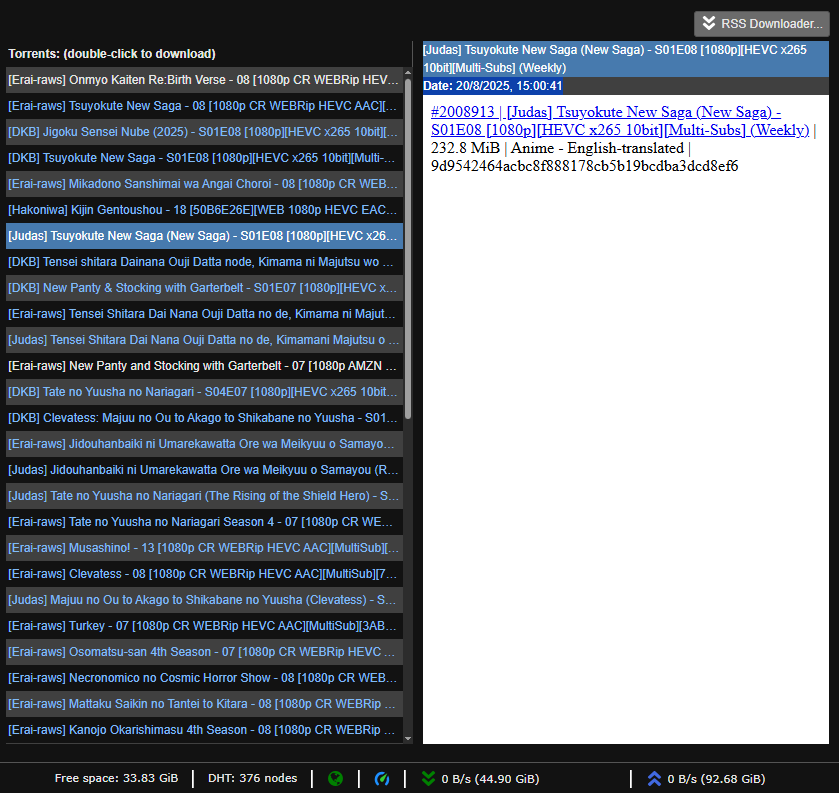
The second is automatic torrent downloading from RSS feeds using rules. This allows me to filter the episodes of the series I’m interested in (either based on keywords or by assigning a specific RSS feed to that series) and thus automatically download their torrents. It also allows me to assign categories/subcategories to these rules so they are downloaded to the desired folders.
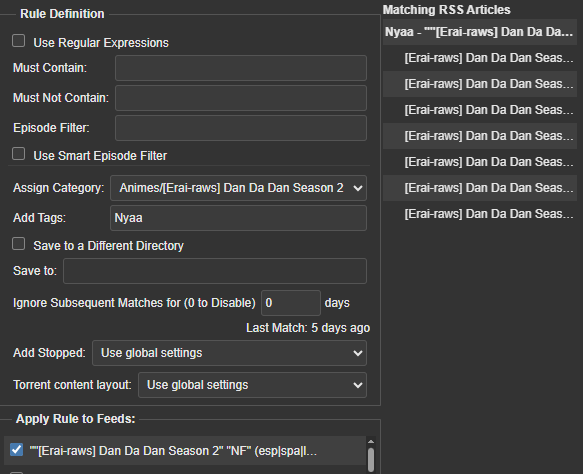
With that, at the start of each anime season, I simply configure the RSS feeds and their rules to automatically download the new episodes, making them available for Shoko/Jellyfin.
Accessing from anywhere
Finally, the last Qbittorrent feature I use is the ability to manage the program through the browser. Since I already have my DDNS provider and reverse proxy set up (explained in the second post), I decided to create its own subdomain to make it accessible over the internet(I also did it for Shoko’s WebGUI).
{
# config.json for the DDNS container
  "cloudflare": [
    {
      "authentication": {
        "api_token": <CLOUDFLARE API TOKEN>
      },
      "zone_id": <CLOUDFLARE ZONE ID>,
      "subdomains": [
        { "name": "media", "proxied": true },
        { "name": "shoko", "proxied": true },
        { "name": "torrents", "proxied": true }
      ]
    }
  ],
  "a": true,
  "aaaa": true,
  "purgeUnknownRecords": false,
  "ttl": 300
}
# Caddyfile
:80 {
  redir https://{host}{uri} permanent
}

media.nehemiasfeliz.com {
    tls /etc/caddy/cloudflare-origin/cert.pem /etc/caddy/cloudflare-origin/key.pem
    reverse_proxy 192.168.1.19:8096
}

shoko.nehemiasfeliz.com {
    tls /etc/caddy/cloudflare-origin/cert.pem /etc/caddy/cloudflare-origin/key.pem
    reverse_proxy 192.168.1.19:8111
}

torrents.nehemiasfeliz.com {
    tls /etc/caddy/cloudflare-origin/cert.pem /etc/caddy/cloudflare-origin/key.pem
    reverse_proxy 192.168.1.19:8090
}
Summary/Diagram of the project
Below I present a diagram that represents how everything configured on Jellyfin/Shoko is currently configured/works.

Unifying different folders into one
Until now, every time I specify the directory where the content to consume is located for Jellyfin, Shoko, and Qbittorrent, I specify the location /mnt/storage. But that wasn’t always the case.
As I mentioned in the first post, the initial components for the project were a laptop (with a 256GB SSD) and a 1TB USB drive. Initially, I simply instructed the containers/programs to use the folder where the USB drive was mounted: /media/user/USB, since I only planned to use the USB drive at the time, as I had “plenty” of space.
When the available space on the USB drive started to dwindle, I installed a 500GB HDD (it was installed where the DVD drive was using an adapter) that I had available to increase the available space. But I didn’t have much thought about how to “increase” the available space. So I simply added another volume to the containers and managed the libraries by instructing them to read from two different locations. Here’s how the containers looked at that point:
    volumes:
      - type: bind
        source: /media/user/USB
        target: /USB
      - type: bind
        source: /media/user/HDD
        target: /HDD
When “once again” the available space was dwindling, I considered adding a folder to the Home directory (for example /home/user/Videos/Animes). But seeing the pattern that was forming, I decided to investigate how to “unify” the different dedicated locations into a single one, so that every time I want to add another drive, I don’t have to add another mount to the container, but rather add that new drive to the unified location.
Lookging for solutions
The implementation of RAID was considered, but not implemented for the following reasons:
- Formatting: Implementing RAID on the hard drive/USB requires formatting the drives to configure them. However, I simply don’t have the space to back up the data on the drives.
- Data loss: Remember that a large part of the storage is a USB drive attached to the laptop. An external factor that disconnects the USB drive could cause total data loss (depending on the RAID level).
- Reduction of available space: The main advantage of RAID is data redundancy (starting with RAID 1), meaning that even if a drive fails or is disconnected, the data is not affected in the first instance. But all of this comes at the cost of reducing the total space of the combined drives, as I only have ~1.5 TB (1 TB + 500 GB) making the most of that space is a priority.
It could be said that using RAID 0 could solve the third problem, and while that’s true, it doesn’t solve the other two problems, which are even more critical.
After some research, we decided to use MergerFS, which is similar to a logical (virtual) RAID 0, but instead of allowing data to be striped across disks, files are saved entirely on a single disk in the array. An example is provided on GitHub:
A         +      B        =       C
/disk1           /disk2           /merged
|                |                |
+-- /dir1        +-- /dir1        +-- /dir1
|   |            |   |            |   |
|   +-- file1    |   +-- file2    |   +-- file1
|                |   +-- file3    |   +-- file2
+-- /dir2        |                |   +-- file3
|   |            +-- /dir3        |
|   +-- file4        |            +-- /dir2
|                     +-- file5   |   |
+-- file6                         |   +-- file4
                                  |
                                  +-- /dir3
                                  |   |
                                  |   +-- file5
                                  |
                                  +-- file6
It clearly has limitations compared to RAID. One of them is that it doesn’t allow saving files larger than the free space on any of the disks, because the file must fit entirely on one disk, since it doesn’t stripe them.
But that’s a case I’m willing to accept. Plus, we have the advantage that if the USB drive is disconnected, the drive join is simply disabled, and the files remain available when the USB drive is reconnected. It also allows you to add more drives to the join simply by adding their locations to the list of locations to join.
Later, when I acquire a large number of drives with good capacity (four 16 TB drives, for example), I will consider using RAID on the server.
Implementation
For the implementation, it was simply a matter of shutting down the containers/programs, modifying the fstab file to mount the USB/Disk and then merging with mergerFS at system startup (to avoid problems), recreating the containers/programs and making the necessary adjustments.
# /etc/fstab

# Mounting for secondary HDD (sda1)
UUID=C60C9F3B0C9F2609 /media/user/HDD ntfs-3g uid=user,gid=user,dmask=000,fmask=111,auto,rw,nofail 0 0

# Mount for USB (sdc1)
UUID=6AF2EC35F2EC06E3 /media/user/USB ntfs-3g uid=user,gid=user,dmask=000,fmask=111,auto,rw,nofail 0 0

# MergerFS Assembly
/media/user/USB:/media/user/HDD:/home/user/Vídeos/Animes  /mnt/storage  fuse.mergerfs  defaults,allow_other,category.create=ff,minfreespace=1G,x-systemd.requires=/media/user/USB,x-systemd.requires=/media/user/HDD,x-systemd.automount  0  0
Explaining a little some MergerFS mounting options
- category.create=ff: MergerFS will always choose the disk with the most free space available at write time.
- minfreespace=1G: Prevents writing to disks with less than 1GB free.
- x-systemd.requires=/media/user/…: Ensures that MergerFS is mounted after individual disks are mounted.
Access servers/services directly without leaving the local network
The latest change/improvement I’ve made isn’t so much to the servers/services, but to how I access them.
So far, regardless of the network/Wi-Fi I’m on, to access my web services using the domain nehemiasfeliz.com, the request leaves that network, goes through Cloudflare, and then to my servers. That in itself isn’t a problem, and it’s to be expected.
My curiosity began when I accessed those servers from my home local network. It follows the same process, but when I do, the request leaves my network, then reaches my network again, then leaves my network, and then enters my network again to deliver the requested data. A bit redundant. Also, my ISP limits my internet connection to 20 Mbps/10 Mbps (which is ~4 MB/1 MB) when the router has a capacity of 100 Mbps (~10 MB), limiting file transfers.
Because of this inconvenience, I decided to resolve this situation. I redirected requests to those servers directly to the laptop without leaving the local network.
Local DNS
To redirect requests to subdomains, you need to configure a DNS that recognizes those subdomains and sends requests to the computer’s local IP address. In this case, use DNSmasq. Modifying dnsmasq.conf file, saving the changes, and restarting the service gives you what you’re looking for:
# dnsmasq.conf

# Basic configuration
interface=lo,eth0
listen-address=127.0.0.1,192.168.1.19

# Redirect only service subdomains to the local IP
address=/media.nehemiasfeliz.com/192.168.1.19
address=/shoko.nehemiasfeliz.com/192.168.1.19
address=/torrents.nehemiasfeliz.com/192.168.1.19

# The main domain(Github Pages) continues to operate normally
server=/nehemiasfeliz.com/8.8.8.8
server=/nehemiasfeliz.com/148.103.0.73


# Use public DNS for everything else (the ones previously in the router)
server=148.103.0.73
server=8.8.8.8
But because my router is quite old, I can’t modify the DNS used. So I have to manually enter the DNS address on the device I want to use it.
A Caddy server for LAN
As in the second post, the DNS only indicates the IP to be redirected, so it was necessary to create a new Caddy container to handle requests based on the subdomain. Therefore, another Caddy container was created and the Docker compose file was modified.
Since we are not accessing Cloudflare we do not need to use their certificates, but simply use Let’s Encrypt certificates (integrated with Caddy) to allow access via HTTPS
# caddyfile
{
	email [email protected]
	acme_dns cloudflare {env.CLOUDFLARE_API_TOKEN}
	http_port  80
	https_port 443
	ocsp_stapling off
}

# Redirects HTTP → HTTPS
:80 {
	redir https://{host}:8444{uri} permanent
}

media.nehemiasfeliz.com {
	reverse_proxy 192.168.1.19:8096
}

shoko.nehemiasfeliz.com {
	reverse_proxy 192.168.1.19:8111
}

torrents.nehemiasfeliz.com {
	reverse_proxy 192.168.1.19:8090
}
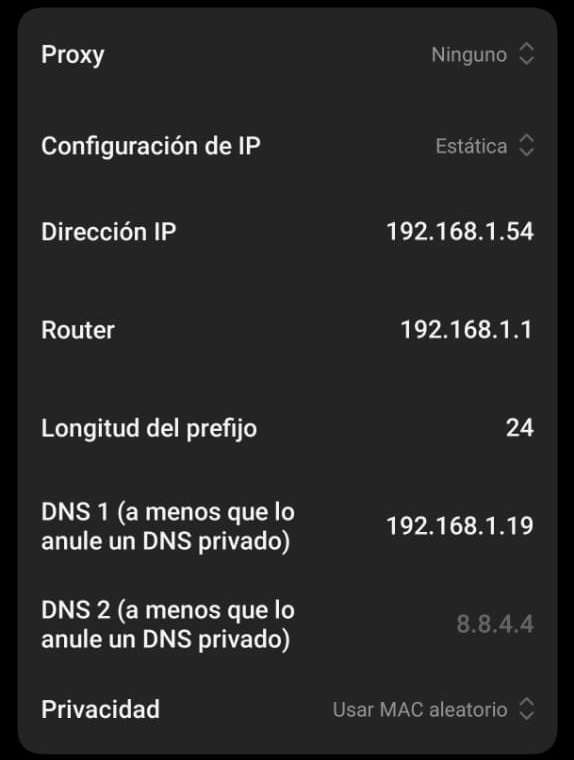
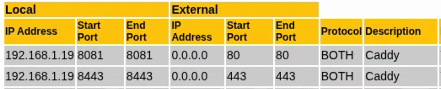
The new container is called caddy-local. Keep in mind that since the idea is to use caddy-local by default, they should use ports 80/443, since those are the default ports for HTTP/HTTPS connections. Therefore, I modified the open ports on the router to different ones (8081/8443), as well as in the caddy-reverse container. This does not affect connections that do not use dnsmasq, so requests coming from outside will continue to use ports 80/443 without any noticeable difference.
# dokcer-compose.yml
services:
  cloudflare-ddns:
    image: timothyjmiller/cloudflare-ddns:latest
    container_name: cloudflare-ddns
    network_mode: "host"
    security_opt:
      - no-new-privileges:true
    volumes:
      - ./config.json:/config.json:ro
    restart: unless-stopped

  caddy:
    image: caddy:latest
    container_name: caddy-reverse
    ports:
      - "8081:80"
      - "8443:443"
    volumes:
      - ./Caddyfile:/etc/caddy/Caddyfile:ro
      - ./cloudflare-origin/cert.pem:/etc/caddy/cloudflare-origin/cert.pem:ro
      - ./cloudflare-origin/key.pem:/etc/caddy/cloudflare-origin/key.pem:ro
      - caddy_data:/data
      - caddy_config:/config
    restart: unless-stopped

  caddy-local:
    container_name: caddy-local
    ports:
    - "80:80"
    - "443:443"
    volumes:
      - ./Caddyfile.local:/etc/caddy/Caddyfile:ro
      - caddy_local_data:/data
      - caddy_local_config:/config
    environment:
      - CLOUDFLARE_API_TOKEN=<API_TOKEN>
    restart: unless-stopped

volumes:
  caddy_data:
  caddy_config:
  caddy_local_data:
  caddy_local_config:
Now that everything is implemented, I can access the server from my devices without leaving the local network and taking advantage of the higher transfer speed offered by the router.
Summary/Diagram of the changes
Below is a diagram that represents how everything is currently set up/working.

Conclusion
I’ll continue to make improvements to the project little by little. I recently purchased three 1 TB 3.5” HDDs and am waiting to buy a rack to add them to the storage.
I’ve learned a lot about space management, networking, and other things. Every step leaves a lesson.